Sunday 25 April 2010

Digital Photographic Practice: Exercise 3: Histograms

What is a histogram?
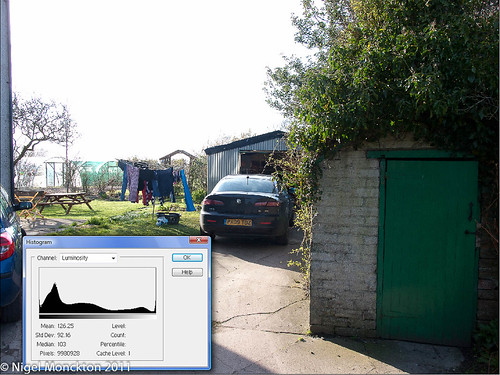
In short a small bar graph that shows how light and dark tones are distributed in the image. In an 8-bit image the tones are represented by 256 bars (0-255) with the dark tones on the left (the low numbers) and the light tones on the right. The height of each bar represents the number of pixels of that brightness (luminosity).

Why is it useful?
The distribution of the bars – the shape of the graph – indicates the exposure of the image. It is generally visible on-camera even in bright sunlight allowing you to assess the exposure when the camera LCD screen is only poorly visible.
On the computer screen during post-processing it provide essential information for using the curves tool effectively.
A low-contrast image will have all the bars compressed together showing a small spread between the lightest and darkest tones, while a high contrast image has a much broader spread – indicating a wide spread in brightness between the lightest and darkest tones. If the graph shows bars pushed to one extreme or the other the picture will have either featureless shadows (pure blacks) or large pure white highlights.

Other tools
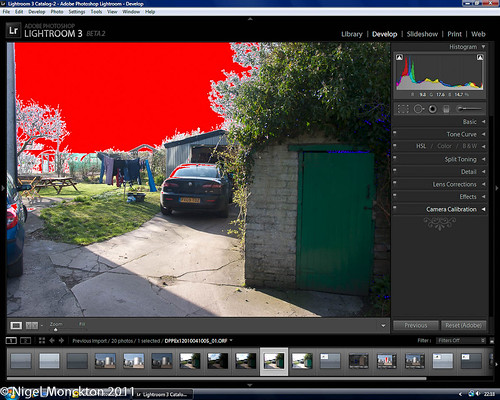
Many cameras and RAW development programs also feature 'blinkies' which can be set to highlight pixels at the extremes to indicate areas which may be suffering from an exposure problem. Sometimes it is possible to set the level at which these can be switched on. On my own camera/computer they are set to highlight tones in the range 0-5 (blacks) and 250-255 (whites) In the exercise I have used them to highlight the areas of the images with exposure issues.

The exercise
I chose a fairly bright sunlit morning for the exercise as this would tend to provide dark shadows and bright highlights. The camera histogram was used to select scenes suitable for the exercise.

Low contrast
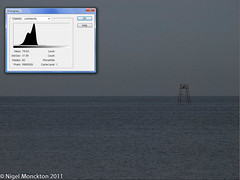
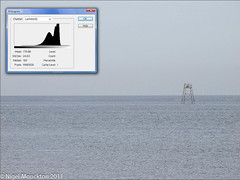
In this shot the sea and the sky are very similar in tone visually, aided by the morning haze.
This is borne out by the histogram which shows the bars clumped together in the middle of the graph. Overexposing or underexposing by a stop moves the histogram to the right (the brighter tones) or left.
Low contrast normal histogram.jpg 
Because of the very low contrast in this image even a full stop of exposure compensation does not cause the bars to touch the ends of the histogram so there are no areas of pure black or white.
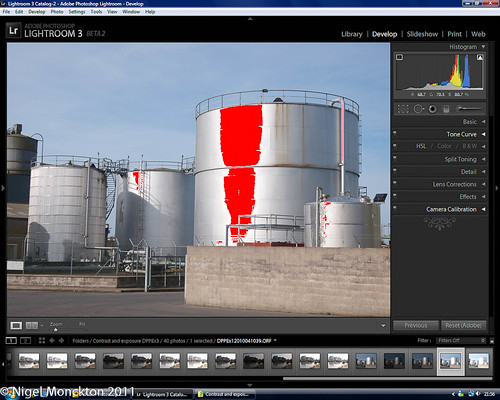
Low contrast under histogram.jpg         Low contrast over histogram.jpg
Normal contrast
In this image the 'normally' exposed version show a histogram in which covers the range of tones. It is perhaps not ideal for the exercise as there is still a clump in the middle caused by the tonal similarities of the sky, concrete and tanks – however it demonstrates the key effects of under and over-exposing a 'normal' image.
The histogram in the proper exposure has a small peak at the right hand end (not visible at this enlargement) This indicates some areas of the picture have turned to pure white. normal contrast normal histogram.jpg
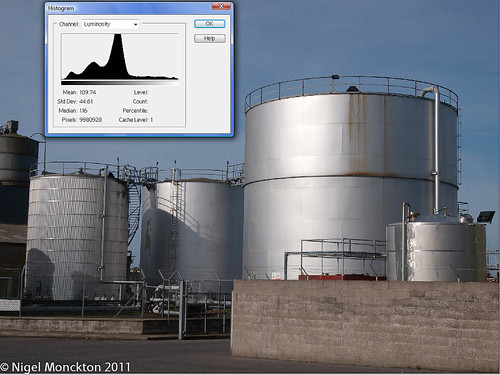
These are highlighted in red (and circled yellow for clarity) in this image. In this case it is at least arguable that these highlights emphasise the metallic nature of the tanks and are not a fault.
normal contrast normal clipping.jpg
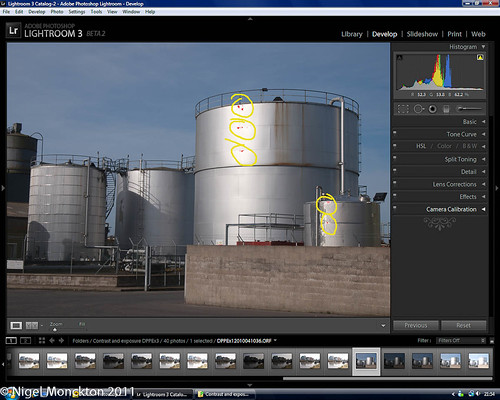
In the under-exposure the detail has been restored to the highlights (and the histogram shifts left). normal contrast under histogram.jpg
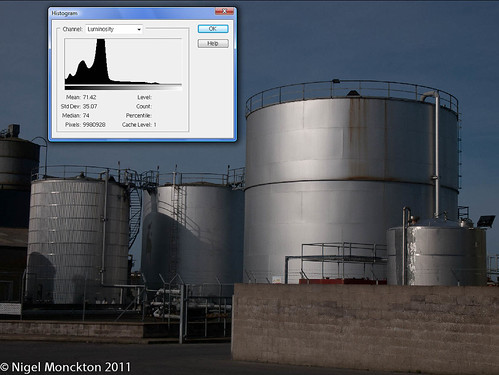
The payback is that some of the detail in the shadows has turned to black (see enlarged image below with blue blinkies showing loss of shadow detail) and this is reflected in the fact that the bars have bumped against the left of the histogram.
Again this is arguably acceptable for non-critical use such as the web as the pure black area is relatively small. normal contrast under clipping.jpg

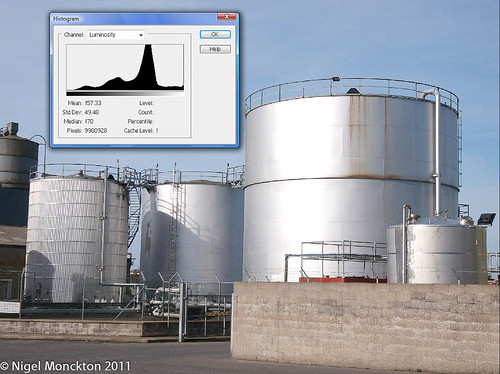
The over-exposure on the other hand has a large and very ugly highlight where all textural detail on the tank has been lost.
This is indicated in the histogram by the way the bars are bumping the right hand edge, and is clearly highlighted by the red blinkies in the next image.
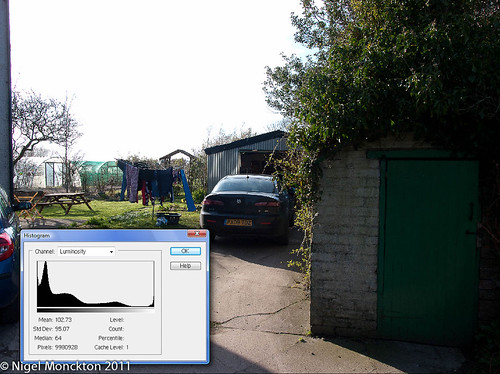
 normal contrast over histogram.jpg normal contrast over clipping.jpg


High contrast
The inclusion of backlit cloud and deep shadows in this shot guarantees that this is a high contrast situation. This is reflected by the bars which butt up against both ends of the histogram. As can be seen from the red (highlight) and blue (lowlight) blinkies there are areas of this image which are pure white (the sky) or pure black (the shadows under the ivy).
high contrast normal histogram.jpg high contrast normal clipping.jpg
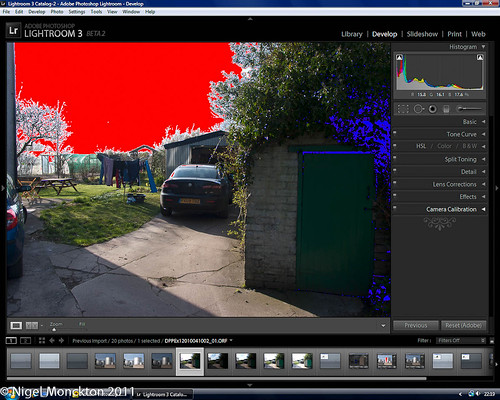
Underexposure by one stop moves the histogram bars to the left. This has the effect of reducing the peak at the bright end, and this can be seen in the increasing detail in the sky – although one stop is not enough to restore all the detail. At the same time the black peak increases in size, and the area under the ivy becomes featureless.
high contrast under histogram.jpg high contrast under clipping.jpg

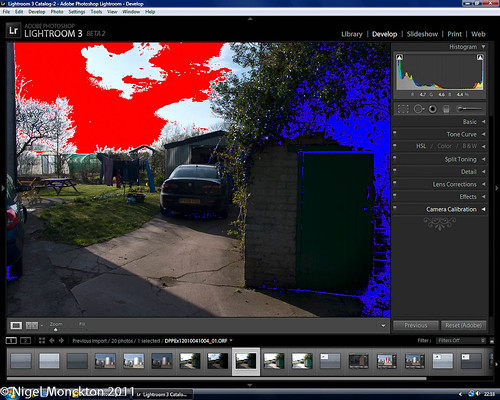
Overexposure moves the histogram to the right reducing the area of pure blacks and restoring the detail in the shed door. As the sky was already lacking detail overexposure has not worsened this, but highlights on the cars are now becoming obtrusive and detail around the edge of the burned out areas is being lost. high contrast over histogram.jpg high contrast over clipping.jpg
None of the photos in the high contrast lighting is truly acceptable. This situation can only be adequately photographed by doing something to reduce contrast – e.g. darkening the sky with an ND filter, using fill-flash to lighten the shadows or by using a high dynamic range technique in post-processing to combine under and over-exposed images.
 
Other issues
Although not a particular issue in this exercise, I have noticed in the past that my camera histogram (and blinkies) tend to be a little pessimistic in indicating overexposure. The exercise notes indicate that the camera histogram takes its readings from the embedded jpeg in the RAW fie which will have been developed from the camera settings. The computer version on the other hand takes its readings from the RAW file. A more detailed explanation of this is available here.

Conclusions
The histogram is a useful guide to exposure – with regular use it enables a better assessment of the overall exposure of the image than a quick look at the image on-camera. It is also a useful indicator of when the subject may be beyond the capability of the camera to capture without assistance of some kind.
Finally this exercise underlines that it is not always wise to rely on what you see. My eyes were able to resolve sky details and shadow details in the final scene where the camera was not.

Wednesday 21 April 2010

Digital Photographic Practice: Exercise 2: Your Own Workflow (ii)

Exercise 1 developed a formal workflow from the bones of my existing practice. To recap it consists of the following steps:
  • Receive ‘commission’;
  • Identify location and model;
  • If possible visit location to identify detailed shot locations (this step added on basis of experience in Ex1)
  • Select lens/lenses and other equipment for shoot;
  • Ensure I have a spare battery and memory card with me, and that camera is functioning and set as expected;
  • Arrive at location and discuss shoot with model;
  • Shoot test shots for exposure and to confirm set-up of camera;
  • Shoot – with occasional checking of technical features – but with key aim of achieving suitable artistic result;
  • Swap memory card during shoot to provide back-up against card fault;
  • Upload images to computer using batch naming and key-wording facilities of software (and recharge used batteries in parallel);
  • Back-up all photos to separate hard drive;
  • Structured edit to remove technical failures and identify top 5 (or so) shots;
  • Develop and PP;
  • Upload final shots to web gallery;
  • Clear/format memory cards.
This workflow can be used for virtually any shoot – if sufficient memory card space is available. Exercise 1 resulted in more than 2Gigs of images in a 45 minute period – easily manageable on a relatively modest 4 GB CF card. For a more prolonged period carrying sufficient memory cards would become an issue if this shot rate were maintained.
Another issue on a prolonged shoot is the greater opportunity to lose or damage a card – which increases as the number of cards increases. Both these issues can be overcome by some form of back-up in the field. Possibilities include:
  • Use of a laptop or portable hard-drive/image viewer. This allows a combination of back-up and coarse editing using a screen that is a significant improvement over that available on the camera. The downside is that it requires the transport of an additional piece of electronics with its associated chargers/batteries.
  • Using a camera store or internet cafe to back-up to CD/DVD. Of course this requires that a store/cafe is available at a convenient location, and the optical media can itself be lost or damaged. Personal experience suggests that it is not always safe to trust back-up to an unknown party – I had a photo CD written while on holiday in Australia in which all the files were reduced to 1200 x 900 pixels. I only discovered this by accident while viewing the CD later. Fortunately I had not yet deleted the originals.
  • Use of online file storage options such as Picasa, or Windows Skydrive. This also requires access to a computer and an internet connection. Again there are risks associated with entrusting valuable data to a third party, and ensuring that it is not corrupted during storage. The advantage is that there are no physical media to lose or damage. Some degree of coarse editing would be helpful here in limiting upload times.
The shoot
My chosen shoot for this exercise is a family weekend trip to London.
Particular factors to be considered in the appropriate workflow are:
  • The aim of the trip is to celebrate someones birthday, not photography – so a minimum of intrusion is needed. This suggests a simple single lens set-up, with no tripod or other ancillary equipment. This includes using the on-board flash for fill if needed.
  • Unlike the portrait shoot there will be a need for spare batteries and/or a charger.
  • The itinerary is variable so the likely number of shots is an unknown. With the easy availability of memory cards, capacity is not likely to be an issue in a single weekend, but the photos will be an important family memory – so rapid back-up would be helpful. As it is unlikely that my family will be sympathetic to a long stay in an internet cafe and internet connections from hotels are generally expensive I will take my Netbook with me.
  • A back-up P&S will be useful for areas where a large D-SLR might be intrusive.
  • Time spent at the computer will be minimised by on-the-fly editing
  • The aim will be two-fold - to produce a selection of prints for the family album, and a separate collection of photographs of London that reflect my own interests.


Review after the weekend 'shoot'.
Editing on the fly kept the final number of photos to a manageable number – around 275 in total – I estimate that I probably edited out around half this total – mainly on technical grounds or because my family thought the shots were unflattering. After an edit I will have a reasonable selection of family photos and a small gallery for my website so this has worked quite well. Back-up was also unobtrusive and easily fitted in around the family arrangements. Overnight charging ensured I always had at least 2 fully charged batteries – more than sufficient for a days shooting.
I didn't use the P&S but it still seems sensible to have had a back-up for an important family occasion.
Conclusions
A good work flow can be flexed to suit the demands of the shoot, a process that encourages a planned approach to shooting. In addition, it is clear that having a structured basis for your photography that suits your own method of shooting provides security for your images and potentially increases your freedom to shoot creatively because the fundamentals will have become a habit.

Sunday 11 April 2010

Digital Photographic Practice: Exercise 1: Your Own Workflow

Examining my current practice:
As a hobby photographer my workflow is quite simple and typically looks like this:
  • Decide to take some photos
  • Ensure I have a spare battery and memory card with me
  • Select lens/lenses and other equipment for shoot
  • Shoot and edit technical failures ‘on the fly’
  • Change cards during shoot if long enough to ensure some images if one card fails (I always do this when visiting somewhere special on holiday, for example)
  • Upload images to computer (and recharge used batteries in parallel)
  • Select photo, develop and PP
  • Repeat previous step until all good photos processed
  • Back-up
  • Clear/format memory card
Upsides:
  • It has developed with time and I’m comfortable using this workflow;
  • It is relatively simple;
  • Charged batteries and clean cards are always available.
Downsides:
  • I often mess up the first couple of shots because I’ve not reset the camera to my standard settings;
  • It’s easy to concentrate on the technical issues of the shoot rather than the artistic;
  • A computer failure during PP would result in the loss of all the images;
  • I have a large collection of images which can only be searched by date;
  • The selection and processing step is very time intensive.
Proposed workflow for portrait shoot
For a ‘commissioned’ shoot a more formal workflow is required to ensure that all the bases are covered. This needs to start with the location of a suitable setting and a chat with the model about the shoot and the poses that we might try.
As the choice of setting should hopefully give a reasonably consistent exposure it would be simplest to establish that with a few test shots. This should allow me to concentrate on the model and the artistic side of the shoot – with periodic re-checking if the style changes significantly e.g. from close-up to full-length, where more of the background will be visible. The test shots will also ensure that I have set the camera up appropriately
On import I will use the facilities of the RAW software (Olympus Studio) to automate file naming, and add keywords and copyright information. Finally I will back up all files to my external hard drive immediately after import.
The final proposed workflow is now:
  • Receive ‘commission’;
  • Identify location and model;
  • Select lens/lenses and other equipment for shoot;
  • Ensure I have a spare battery and memory card with me, and that camera is functioning and set as expected;
  • Arrive at location and discuss shoot with model;
  • Shoot test shots for exposure and to confirm set-up of camera;
  • Shoot – with occasional checking of technical features – but with key aim of achieving suitable artistic result;
  • Swap memory card during shoot to provide back-up against card fault;
  • Upload images to computer using batch naming and key-wording facilities of software (and recharge used batteries in parallel);
  • Back-up all photos to separate hard drive;
  • Structured edit to remove technical failures and identify top 5 (or so) shots;
  • Develop and PP;
  • Upload final shots to web gallery;
  • Clear/format memory cards.
Although this appears to have considerably more steps it feels better structured, seems likely to save time in the longer run and provides better insurance against equipment or photographer failure.
Review of workflow after shoot
The location for the shoot was the beach/dunes/dockside area in the local town of Silloth and the model was my daughter. After several days of light overcast conditions the day of the shoot was clear and sunny. I deliberately set a timescale of no more than 45 minutes for the shoot itself. In the time available (which I extended for  a few minutes ) I took 166 shots which will be used in Exercise 4: Editing
Ex1ScreenGrab
A short recce of the location before the shoot provided several ideas for settings and poses – clearly a helpful idea given the short time frame. This would be a useful addition to a ‘formal’ workflow if time is available.
As a result of the more contrasty light I had to review images rather more frequently than I had intended to ensure the exposures were reasonable. However I did not edit on-the-fly as it would have interrupted the flow of the shoot – a useful development over my previous workflow. I also did not change cards during the shoot as it was short and easily repeatable – however it still seems a sensible precaution for a longer shoot.
On returning home the discipline of immediately backing up took very little time. A hard copy back-up to DVD at the same time is probably also a sensible precaution in a professional workflow.
Overall the workflow appears effective and an improvement on my previous practise.
Resources:
A quick search on Google turns up a huge number of items on digital workflow. I found the following useful in preparing for this particular exercise, but there are many more:
Digital Photography Workflow – Fine Art Photography: Michael Ezra
The Ideal Digital Photographer’s Workflow
Develop an Efficient Photography Workflow

Thursday 8 April 2010

And so it begins…

Material for Digital Photographic Practice arrived earlier this week. Very well presented it is too – all neatly wrapped in red tissue paper inside a sturdy box.
Have scanned through the material and completed and sent off my student profile as per the getting started letter. Also spoke to my tutor as suggested – although at this stage I clearly didn’t have much of intelligence to say except ‘hello’.
The exercises and assignments seem nicely varied – some more attractive and challenging than others. I think they will bear a good read as my initial impression is that some are independent of others and could easily be carried out in parallel while some could quite easily be combined.
I’m a bit flummoxed by the fact that the very first exercise involves a portrait session as I ‘don’t do’ people on the whole. So - good discipline being instilled already.
The only things that’s not really clear to me at present is how we submit a blog for assessment. I think I’ll be keeping the learning log twice, once as a Word file and also on this blog. I can then get the best of both worlds and with a bit of cut and paste will only have to do the job once anyhow.